Creating and sending estimates or quotes is a key part of managing your jobs and keeping your customers informed about potential costs. In ScanPay, the Estimates feature allows you to send detailed, professional estimates to your customers before starting a job, helping you set clear expectations and avoid misunderstandings about pricing. Whether you’re quoting for a service, product, or combination of both, you can easily create, customize, and send estimates directly from your ScanPay account.
Note: To use Estimates, you must first subscribe and set up your “Estimates” plan for your teams.To learn more about the Estimates subscription, please see this article.
There are two ways to create estimates in ScanPay:
- From a job (we’ll cover that later)
- As a standalone estimate, which is the focus of this article. The steps for creating a standalone estimate are similar for both the web and mobile apps.
Creating a standalone estimate
1. Start by going to Estimates > Create estimate

a. On the mobile app, you can also tap on Create Estimate from the homepage.
2. Start by selecting Add customer - you can Choose an existing customer or Create new customer by entering their name, contact, and address details.

Add line items to your estimate
- Click or tap Add Line Item to include services, products, or fees. You can select from your catalog or enter custom items with prices.
- Apply a Discount, or a service charge and make sure the Service Fee is as expected.
Configure the estimate settings
- Set when the estimate Expires on. Your customer has until that date to accept or reject your estimate.
- Assign the estimate to the right team member. You can use this space to choose who sold the estimate to the customer.
Add any extra information to the estimate
- Under Notes, add any relevant information about the job or quote related to this estimate.
- Under Attachments, select Add a photo to attach photos to the estimate
- Confirm or edit the Terms and Conditions if needed.
- Choose whether to Request a customer signature to accept the estimate.
- Add a Lead Source to track where the lead came from.
- Optionally, add a Reference ID to help track and find this estimate manually later.
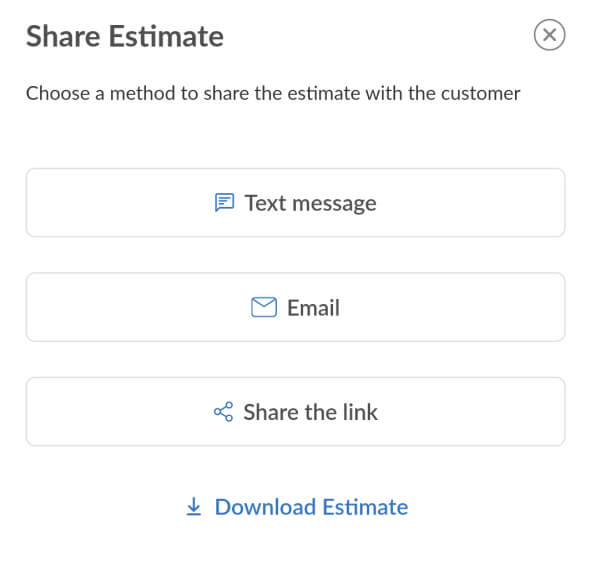
Saving and sending your estimate
- Once you have added all the items, click Create and share.
- Choose how you want to share the estimate:
- By QR code
- By email
- By text
- By link
What your customer will see
When you send an estimate, your customer will see:
- A breakdown of line items with pricing, taxes, and discounts.
- Notes, terms and expiration date if you’ve added them.
- An option to accept or reject the estimate.
Once a customer accepts or rejects an estimate, the status is automatically updated in the system,
[Placeholder for visual aid: Screenshot of what the customer sees – Estimate details with options to accept or reject]

Tip: You can update your business details or logo on your estimates, by editing your team profile.
- On the mobile app, go to Manage Team > tap the Edit button next to your team name.
- On the web app, go to Team Profile
Creating an estimate from a job
- Open the job you want to create an estimate from
- Select the Billing tab
- Under Estimates, click Add estimate.
